Removing bios password in Toshiba Netbook NB200
 Recently I bought a Toshiba Netbook NB200. If you use a computer mainly for email, browsing, music etc. this is a great machine. It has good performance with pre-installed Windows XP. The only problem I found was the power LED which is a major irritant during daytime. Don’t even think of using a Netbook as your primary development machine.
Usually I don’t put a BIOS password on the computers I use. I normally keep my content protected and never felt the need to use a BIOS password. But when I got Netbook, I decided to put a BIOS password. A few days later I removed the BIOS password. After a few reboots suddenly the NB200 started asking for BIOS password. To my horror, it refused to accept the earlier password and after 3 attempts I got a nasty message on screen – “System Disabled. Error 0004” (Sometimes it was Error 0000).
The Toshiba Netbook NB 200 comes with a Phoenix BIOS named “phoenix trustedcore setup utility”. It probably has a bug related to password reset. I am not sure about the bug, but one thing is sure – Entering incorrect BIOS password three times causes some flag change in CMOS/EPROM and it permanently disables the system. The only option left was to take it to a Toshiba service centre with proof of ownership to get it unlocked! In short “trusted” means customer is screwed[If you own a NB200, I suggest you update the BIOS firmware immediately].
But then I realized that there are no Toshiba service centers in my area and the only option was to send it via courier. It meant that I may not see the NB200 for the next few weeks and it is sure to cause me a lot of headache. So the next thing to do was to see whether there is a way to either clear the password or bypass the password. After a bit of Googling I came to know that earlier Phoenix bios chips had backdoor passwords such as PHOENIX, CMOS, BIOS etc. Some Toshiba laptops had “Toshiba” as the backdoor password. However none of them worked on Netbook NB200. So the only option was to open NB200 and see whether I could pull out the CMOS battery. I was pretty excited since it was a while since I did some hardware hacking!
Hacking Toshiba Netbook NB200
Step 1 : Getting the tools for the Netbook surgery
Following is the toolset I used to disassemble Toshiba NB200. I had recently purchased a screwdriver set for mobile devices from Bangalore ($3) and it came really handy for opening NB200. I also used a multi-LED torch so that I can take a look at the edges to see how to open a specific section. A torch is must have if you don’t have the technician manual with you.
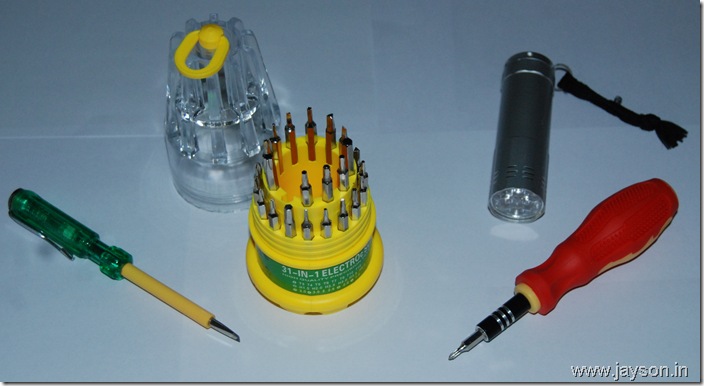
Toshiba cover design is such that without technician manual, it is very difficult to open the Netbook. Also the screws are not tough enough and if you don’t select a correct screw driver bit you may damage the screws and then you are completely stuck. I had to saw the inner cross section of one of the screws after it got damaged by a wrong screwdriver bit.
Step 2 : Getting the Netbook NB200 ready for the surgery

Before opening the Netbook ensure that you have removed the battery. It is very important and initially I forgot to do that. Luckily nothing bad happened.
Step 3 : Opening the back cover of Toshiba NB200
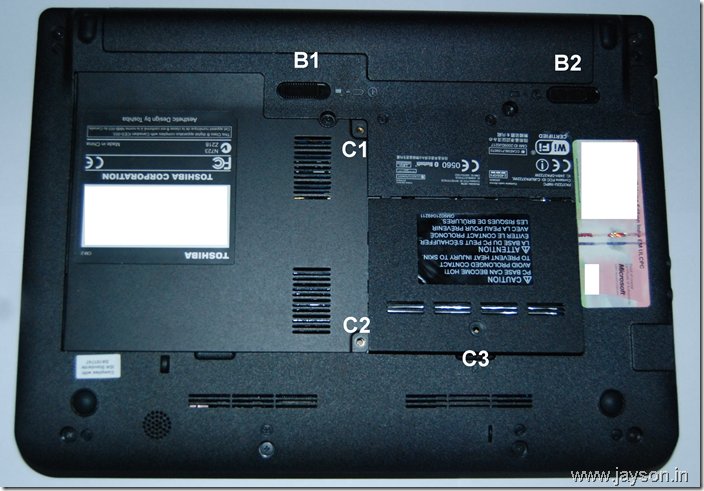
To remove the battery unlock the switches indicated above as B1 and B2 and then pullout the battery on top. Then remove screws indicated as C1, C2 and C3. It is fairly easy to remove the plate behind C1/C2. However removing C3 plate requires some effort and requires you to pull it out hard. Behind C3 plate you will find RAM module and behind C1/C2 you will find hard disk and WLAN card.
Step 4: Removing hard disk, WLAN card and memory module
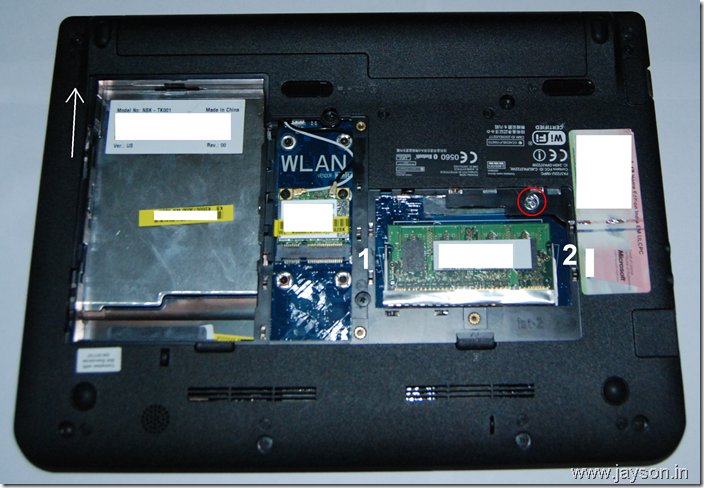
To remove memory module, press out the locks indicated as 1 and 2 and then pull out the memory card. To remove hard disk push the hard disk as indicated. Removing WLAN card requires you to remove two screws. Unless you want to completely dismantle Netbook, it is better not to touch WLAN card. The red circle indicates the screw damaged due to wrong screw bit.
Step 4: Removing BIOS password on Toshiba Netbook NB 200
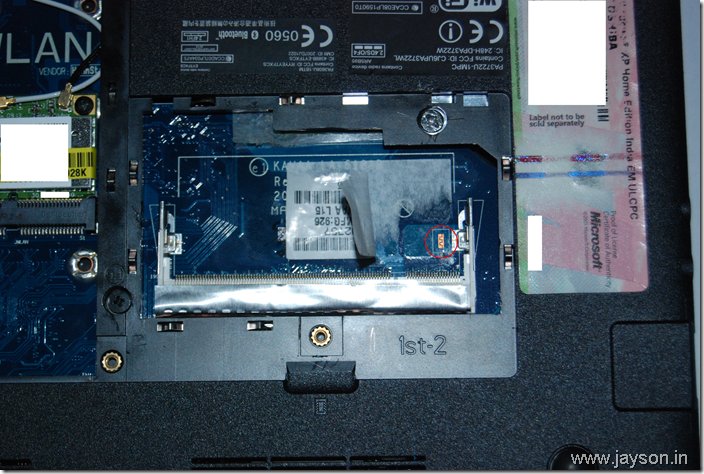
After removing the memory module I noticed a paper sticker behind it. So I removed the paper sticker and then noticed the jumper as indicated by the red circle. To remove the CMOS/BIOS password all you need to do is to short circuit the jumper leads. Use a screw driver to do that and keep it short circuited for 10 seconds.
Now you may be wondering how I found this without the technician manual. To be frank it was pure luck. From a couple of other sites I came to know that resetting password required short circuiting some jumper. For example, the instructions to reset BIOS password on Toshiba Satellite L10 is,
– Open Wi-Fi Cover
– Locate & Short Out JP1 for 15 Seconds
I think the same technique might work on other Toshiba Netbooks namely NB100, NB205 etc.
Step 4 : Dismantling Netbook completely
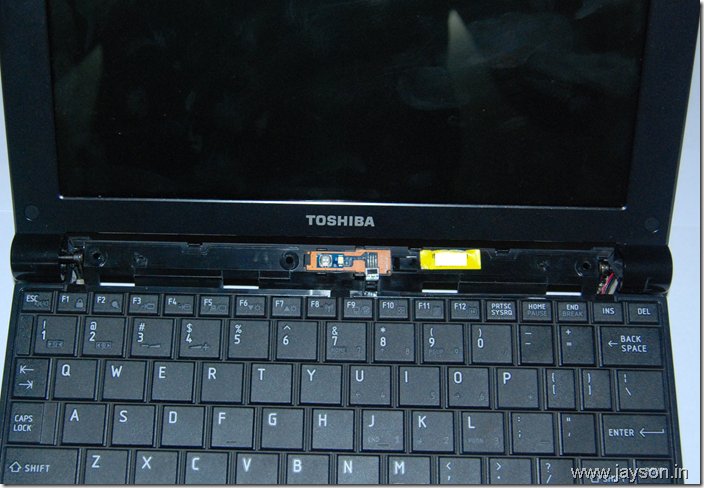
If you want to dismantle the NB 200 completely you need to remove all screws marked as F6 and F4 at the back cover. Then you can remove the top cover over the power light as shown above. After removing the cover above, pull out the keyboard completely. Before pulling it out ensure that you remove the keyboard connector.
Step 5 : Final steps

Now to dismantle NB200 completely you need to remove a number of connectors including monitor connector (top left with white sticker) and a number connectors on the right. Then you need to remove four screws on both sides of the monitor lid. This way you can completely detach LCD screen from the Notebook base. By this stage I had already spent about 5 hours on it and hence assembled it back.
Last week I sold NB200 since I realized that a Netbook is not something I needed. It is too big to replace a mobile device and was not good enough to replace a laptop.
November 18, 2009 | Posted in DIY 22 Comments » | By Jayson

August 27th, 2010 at 9:53 am
hi, wonder if you know how to reset a Samsung N130 BIOS too 😉 ?
August 31st, 2010 at 9:34 am
@Der, No idea. But I guess it would be something similar.
September 10th, 2010 at 8:09 am
Hello I wanted to know how to reset the BIOS password of Sony Naio Notebook?
September 13th, 2010 at 11:49 am
hi. first of all i want to mention tha your job about nb200 is really great. but i have a question and the question is: what you mean when you say “short circuit the jumper leads” i am from greece and i can’t translate the most important part..
thanks a lot.
P.S. my netbook invent a new bios. i can’t understand how.
October 29th, 2010 at 5:17 pm
Excuse-me, after I’ve finished covering the back of the laptop it really starts without asking for a password. So it really works. Now I press F12 to select USB boot (I already prepared an Usb pen with the Xp system. Look at: http://tecnoloxiaxa.blogspot.com/2008/10/instalar-windows-xp-desde-un-pendrive-o.html) and start with windows xp istalling. The problem now is that it doesn’t see the hard disc. Maybe we need a diferent controller for the hard disc (Scsi o raid)? Xp installer ask for it when it starts running. Can you help me?
Thank you any way.
November 1st, 2010 at 9:29 pm
Just wanted to thank you very much for your clear directions and photos. Your directions were very helpful when I wanted to remove the hard drive that had failed. 🙁
December 11th, 2010 at 10:46 pm
Thanks for publishing this. My friend had exactly the BIOS password issues you described. I was about to udnertake the same dismanteling process (I started looknig for the right screwdriver bits) as you were, and found your instructions in time.
Thanks for going to the effort of putting what you learned online.
March 8th, 2011 at 3:44 am
Hi Jayson:
I want to thank you by this helpfully directions you put it here, there were very functional. But now i’ve got a problem. Someone (I don’t know who), put a HDD/SSD password in this netbook. How can i remove this?
Big regards, Cheers!
Salvador.
April 9th, 2011 at 7:00 pm
We’ve dismantled the NB305 (almost the same) and found that there is a tiny battery that’s smaller than a dime once the LCD panel is removed. Unfortunately, this little thing is soldered to the board both positive and negative, so you will need a soldering gun to undo the lead (not the battery side – this is epoxied on. ….Obviously to cheap to use a plug or better yet, a jumper next to the memory.
April 27th, 2011 at 3:38 pm
RE: 8. Salvador’s problem
I had the same problem, removed the BIOS password, but when it started, it asked for a HDD password (which it apparently didnt have before)
I tried several names that the owner suggested, none worked, so as a last resort, I tried ‘toshiba’ and it worked.
The owner insists that they never put a HDD password on it, only a BIOS password. so you may want to try it
September 10th, 2011 at 8:44 am
Sir
can you help me how to remove HDD password on my NB205. i can open my bios but my HDD has a password i buy my NB205 on a person and it’s in good condition i can play dota and surf in internet but now the HDD is asking a password. i Didnt put a password on my HDD? my HDD is 160Gb Hitachi SATA hard drive. can you help me with this… Thanks your genius… God bless
September 11th, 2011 at 11:17 am
Cheers. +1 Works. End of. On NB250 slight difference under sticker, but principle the same.
October 24th, 2011 at 12:56 pm
i have a nb 250 but i can´t find the jumper, billy can u post or send me a photo whit the exact location please.thank
October 28th, 2011 at 4:32 pm
Thanks so much for this information, I just bought this through ebay in bright pink and it was just what I needed, I then added a password, got annoyed and removed it. Talk about panic, then I found your website. as an IT technician I was dreading the cure although I knew I would be shorting a jumper, you saved me hours of work. You are my hero of the day. XXX
November 7th, 2011 at 11:35 pm
Can anyone help me, I have similar issues as others. Can you help me how to remove HDD password on my NB305. I can open my bios but my HDD has a password I typed in what I thought was the password and it wont let me into Windows 7. HDD is Fujitsu MJA2250BH G2 – (S1)
Anyone got any ideas?????
November 9th, 2011 at 3:12 am
Hi! how i short circuit the jumper leads? just put the screw driver in the jumper for 10 seconds?
Thanks.
April 6th, 2012 at 7:44 pm
Worked a treat thanks alot.
February 6th, 2013 at 8:19 pm
Hello, this method WORKED for a Toshiba NB305-N410BL simply remove memory cover and memory module and short the jumper J1 located right under the memory module you just removed for 15 seconds with the battery and power cord removed. This method Worked first try.Thanks
February 17th, 2013 at 12:59 am
GENIUS!!!! Thanks so much for posting this!!
February 18th, 2013 at 12:26 am
I don’t understand the need to buy the special screwdriver and take off the HDD / WiFi plate. Removed the RAM cover, peeled back the sticker and used a flathead screwdriver to short the connection for 10 seconds.
June 28th, 2013 at 4:33 pm
Works for the Toshiba NB500, tiny jumper just under the RAM module. Just short with a screwdriver for 10 secs.
April 6th, 2015 at 5:15 pm
YES it is also working for NB250. I just tried it now. Thanks a million